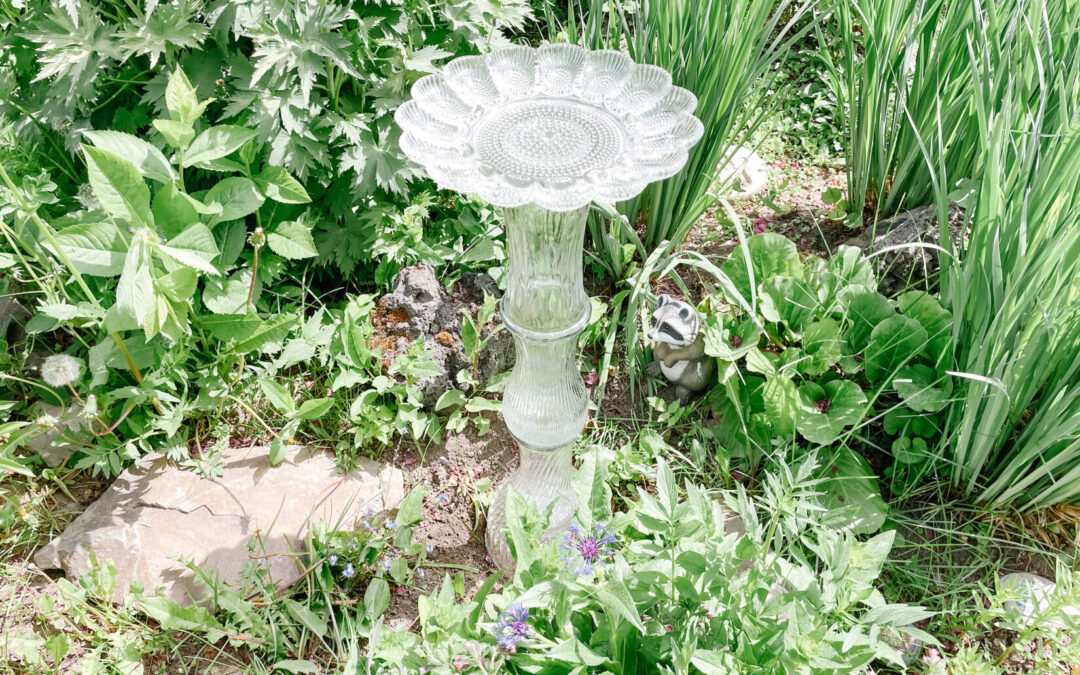
Spring is here, which means so many more of our feathered friends have returned! If you’re looking for fun, affordable, and unique DIY bird bath ideas to create a bird-friendly oasis right in your own backyard for your local birds, you’re going to love this tutorial. I’m showing you how to make an upcycled thrift store glass bird bath! Not only is it quick and easy to make, but it’s also a great idea for repurposing old glass vases that sit forever unloved at thrift stores (or your neighbourhood yard sale). The beauty of this project is that no two bird baths will be the same, and your garden will look stunning with this one-of-a-kind DIY, customized to your taste and style.
Before we begin, let me recognize that there are many ways to make a DIY birdbath that your local bird community would be proud to splash around in! Some options include:
- A terra cotta saucer
- A concrete bird bath
- A plastic plant saucer
- A vintage sink
While I know they would all be lovely in their own way, I didn’t want to make any of them myself. Most of these DIYs are complicated (concrete bird bath! That would take some skill), and none of them have the easy-breezy look I was going for. I didn’t want bold color or elaborate designs. I wanted an easy DIY that would fit in well with other decor items I already had in my outdoor space. So, I decided on a very easy design using thrifted glass items for both the stand and bird bath bowl, and I’m so excited about how it turned out.
Let me show you how I did it so you can make your very own DIY bird bath out of thrifted glass!
Supplies for a Thrifted Glass Bird Bath
- 3 tall glass vases (I found mine at the thrift store, but if yours comes up empty you can also try the dollar store to keep it inexpensive)
- 1 glass platter
- 1 glass bowl with a flat bottom
- Two-part epoxy (clear)
- Popsicle stick
- Disposable plastic cup for mixing epoxy
We purchased the Gorilla glue epoxy at Home Hardware, but it’s included with our other favourite craft supplies in the links below.


How to Make a DIY Bird Bath
Let’s get right into how to bring a little bit of DIY whimsy to your backyard birding experience!
1. Grab your thrifted glass
Purchase three glass vases, one glass bowl, and one glass platter from your local thrift store. Wash and dry them well.
2. Mix the epoxy
The epoxy is the key to a successful glass bird bath, so make sure you do this part right! The package contains a resin component and a hardener, and they need to be mixed together very well and then applied quickly. I recommend that you mix small amounts as you need it, because it dries fast. When you’re ready, squeeze the two parts into a disposable plastic cup and then mix them very well with your popsicle stick.
3. Glue the vase to the bowl
Put some glue on the bottom edge of one glass vase and attach it to the bottom of the bowl. (Check for drips as you go and smooth them out with your popsicle stick.) Set this piece aside and allow it to dry for at least five minutes. You need the glue to set properly before you handle it again.
.


4. Glue the second vase to the platter
Now it’s time to build the next piece of the base. Glue the second vase to the bottom of the platter using another bit of just-mixed epoxy, just like the first time. Allow this piece to dry for at least five minutes, too. Go make a cup of tea and sit in your yard for a few moments while you wait. You deserve it!
5. Add the other vase
Once those first two pieces are set and dry, glue the last vase right side up onto the vase/bowl combination and allow this to dry for another five minutes.
6. Assemble all pieces
Now, it’s time to epoxy the pieces together! Attach the vase/bowl combo to the vase/platter combo and let them dry for…you guessed it! About five minutes.


Finishing touches
Once your DIY thrifted glass bird bath is assembled, put it in place in your yard! Birds feel most comfortable landing where there is cover to escape to in case of danger, so try to place it somewhere around trees or shrubs. And to make the slippery surface of the glass and the deeper water in the centre easy to navigate for birds of all sizes, consider placing rocks in the centre of your bath for them to stand on. Hang a bird feeder and bird house close by and provide a one-stop real estate shop, and see what you attract!
There you have it—a quick and simple DIY glass bird bath to bring new life to your garden oasis. The glass cost me only $12, and I think that was a solid investment for the return. It brings a smile to my face and beauty to my backyard, and what else could I hope for from a weekend DIY? I hope you love yours as much as I love mine.
If you love Thrift Flips, then check out the Furniture and Thrift Flip playlist on my YouTube channel.


Any questions? Let me know in the comments!
We would love to hear about your thrift store bird baths! Share with us by tagging @sobrighthome on Instagram or any of our other social media channels.
This post is not sponsored however, some links may be affiliate, which means I may earn a small commission if you shop using the links. There is NO extra cost to you. The opinions and photos are of So Bright Home.


